Protecting ReactJS application with Keycloak
We could write all the code in ReactJS that connect with Keycloak for authentication and authorization. But this is time consuming process and requires thorough testing to be error free. Instead we rely on client adaptors provided by Keycloak.
Client adaptors
Client adaptors are libraries which we can integrate to the client application program (in our case the ReactJS application). Keycloak provides these client libraries. This is available for different languages. We use here the JavaScript client adaptor since we are targetting ReactJS client application in this blog.
Keycloak’s javascript client adapter supports diffrent flows.
We will use authorization code PKCE flow in this blog.
First requirement is to configure a client with Keycloak.
Configuring client
I did the following
Before creating the client make sure your realm is active. Select “Clients” and then “Create Client” option.
Some of the inputs for OpenID Connect flow are as follows..
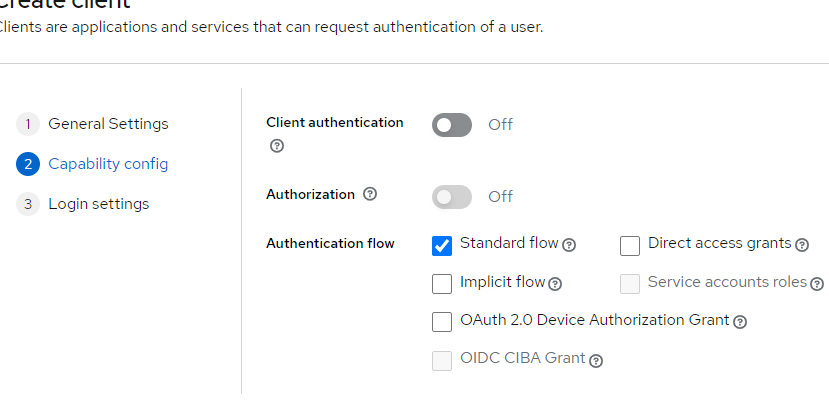
Autentication flow: Select only Standard Flow (as shown below)
 Client name: reactjs-client (any name as you prefer)
Home URL: http://localhost:3000
Valid redirect URI: http://localhost:3000/*
Valid post logout URI: http://localhost:3000/*
Web Origin: http://localhost:3000
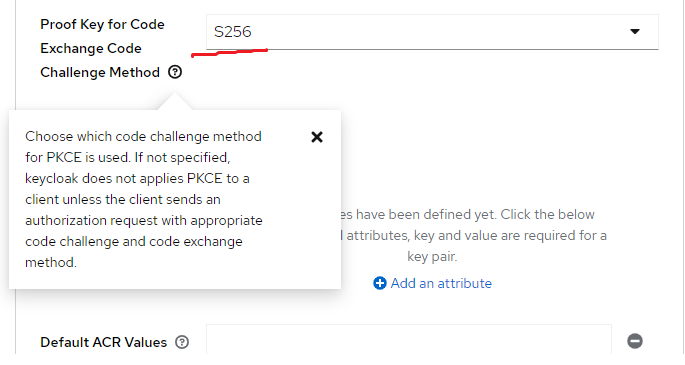
Save the client. Open it again and go to the Advanced tab.(I am using Keycloak 22.0.5)
Select the PKCE challenge method as follows.
Integrating client adapter with ReactJS application
Create ReactJS application
Pre-requisite of create react application
Node and npm
Editor(say, Visual Studio Code)
To create ReactJS try the following from the terminal (of Visual Studio Code)
npx create-react-app enc-reactjs-app
This creates a project wit name enc-reactjs-app with certain default settings. Change to that directory
cd enc-reactjs-app
Install Keycloak JavaScript client adapter. I am using Keycloak 22.0.5. So I will give as below.
npm i keycloak-js@20.0.5
We use authorization code flow PKCE here.
Before the coding let us look how it works
Authorization code PKCE flow in general as far as OpenID Connect is concerned
A random code verifier is generated for each request. Using SHA256 (we had selected S256 as the challenge method while creating clientid) the code verifier is converted to a hash form. The resultant value is termed as code challenge. In the diagram below, it is shown as transformed code verifier (t(code_verifier)) and challenge method as t_m (for us its S256).
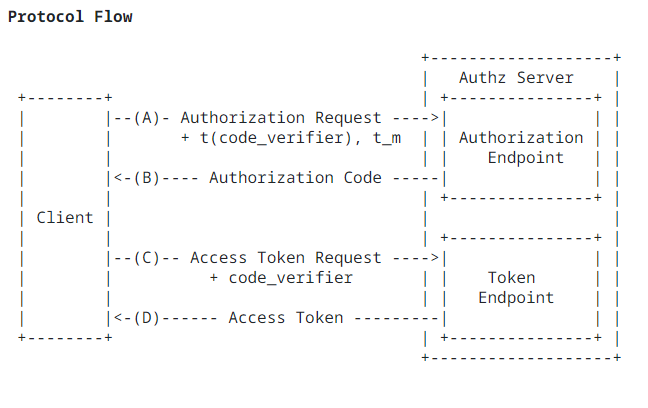 The Code challenge and challenge method are passed in the first flow which is the authorization end point flow. An authorization code is returned after a successful authentication. A silent request is then carried with actual code verifier to the token endpoint of Keycloak. Keycloak will do the hashing using challenge method (our case S256) and compare against the code challenge in the first flow. If its same, the request is from genuine client.
Code changes
Add the following code to set up authorization code PKCE flow.
File src/index.js
import React from 'react';
import ReactDOM from 'react-dom/client';
import './index.css';
import App from './App';
import Keycloak from 'keycloak-js'

let initOptions = {
  realm: "encourageat", // realm as configured in Keycloak
  url: "http://localhost:8080", // URL of the Keycloak server
  clientId: "reactjs-client", // client id as configured in the realm in Keycloak
  onLoad: 'login-required',
  KeycloakResponseType: 'code',
  pkce: true,
  pkceMethod: 'S256'
};

const keycloak = new Keycloak(initOptions);

let authenticated = false;
let username="";
let status = "";

keycloak.init({ onLoad:  initOptions.onLoad,
                KeycloakResponseType: 'code',
                pkceMethod: 'S256'}).success((result) => {
  if (result) {
      authenticated = true;
      username =  keycloak.tokenParsed.preferred_username;
      console.log("Welcome user " + username);
      //keycloak.token gives access token
      //access token should be kept confidential and intended for secure API
      //calls
  } else {
      console.log("User authentication failed!");
      status="Not success";
  }

  const root = ReactDOM.createRoot(document.getElementById('root'));
  root.render(
  <React.StrictMode>
    {authenticated ? <App username={username}/> : <h2>{status}</h2>}
  </React.StrictMode>
);
}).error(() => {
  console.log("Could not authenticate the user due to error!");
});
File src/App.js
import logo from './logo.svg';
import './App.css';
import React from 'react';

const App = (props) => {
  return (
    <div>
        <h1>Welcome {props.username}</h1>
    </div>
  );
};
Redirected URI Example:
http://localhost:8080/realms/encourageat/protocol/openid-connect/auth?client_id=reactjs-client&redirect_uri=http%3A%2F%2Flocalhost%3A3000%2F&state=26c15868-97db-4676-80d3-0d3b457549f7&response_mode=fragment&response_type=code&scope=openid&nonce=6c15f5c3-859a-4dc7-8c4d-43def1769c70&code_challenge=Mxpy70RZ2-shRhspAU4QFGPsZQYPUgc0MRpTyHqrMRw&code_challenge_method=S256
We could see in the above redirected URL, code challenge and code challenge method. Ideally, the javascript adapter should be performing a token end point request further on receiving authorization code. (as per authorization code PKCE flow). These all seem to be hidden inside the code. Ideally, they are back channel calls in normal implementation.
Reference(s):
https://www.keycloak.org/docs/latest/securing_apps/
https://datatracker.ietf.org/doc/html/rfc7636
https://medium.hexadefence.com/securing-a-react-app-using-keycloak-ac0ee5dd4bfc